How to Calculate NDVI from Sentinel-2 in QGIS Using Raster Calculator and Model3 Automation
Monitoring vegetation health is one of the most common applications of remote sensing. One of the most widely used vegetation indices is the Normalized Difference Vegetation Index (NDVI).
In this tutorial, we demonstrate:
- How to compute NDVI manually in QGIS
- How to automate the process using a QGIS Model3 file
- Common mistakes and how to fix them
This workflow is based on Sentinel-2 Level-2A (Surface Reflectance) imagery and QGIS 3.28.
1. What is NDVI?
NDVI is calculated using two spectral bands:
- Red band (B04)
- Near Infrared band (B08)
The formula is:NDVI=(NIR+Red)(NIR−Red)
NDVI values range between -1 and +1.
| NDVI Value | Interpretation |
|---|---|
| < 0 | Water |
| 0 – 0.2 | Bare soil / urban |
| 0.2 – 0.5 | Moderate vegetation |
| 0.5 – 0.8 | Dense vegetation |
2. Preparing Sentinel-2 Data
Download Sentinel-2 Level-2A (L2A) imagery.
Inside the SAFE directory, navigate to:
GRANULE → IMG_DATA → R10m
You will find:
B04_10m.jp2→ RedB08_10m.jp2→ NIR
These are the only bands required for NDVI.
3. Method 1 — Manual NDVI Calculation in QGIS
Step 1: Load Data
Drag into QGIS:
- B04_10m.jp2
- B08_10m.jp2
- (Optional) Study area polygon
Step 2: Clip to Study Area (Optional)
Go to:
Raster → Extraction → Clip raster by mask layer
Clip both bands using your AOI.
Step 3: Raster Calculator
Open:
Raster → Raster Calculator
Use this formula:
(A - B) / (A + B + 0.0001)
Where:
- A = B08 (NIR)
- B = B04 (Red)
Important settings:
- Output data type → Float32
- NoData value → -9999
- Save as
NDVI.tif
Step 4: Fix Symbology
Right click NDVI layer → Properties → Symbology
- Render type → Singleband Pseudocolor
- Min = -1
- Max = 1
- Color ramp: Red → Yellow → Green
Now vegetation will appear green and water will appear negative (blue/red).
4. Method 2 — Automating NDVI Using a Model3 File
For repeated analysis (multiple dates, tiles, or study areas), automation is essential. QGIS Model Designer allows you to build reusable workflows saved as .model3 files.
Why Use a Model3 File?
- Eliminates repetitive steps
- Reduces user error
- Ensures consistent processing
- Useful for teaching and research
- Easy batch processing
Download a Ready for Use Model3 File for NDVI Estimation using Sentinel images
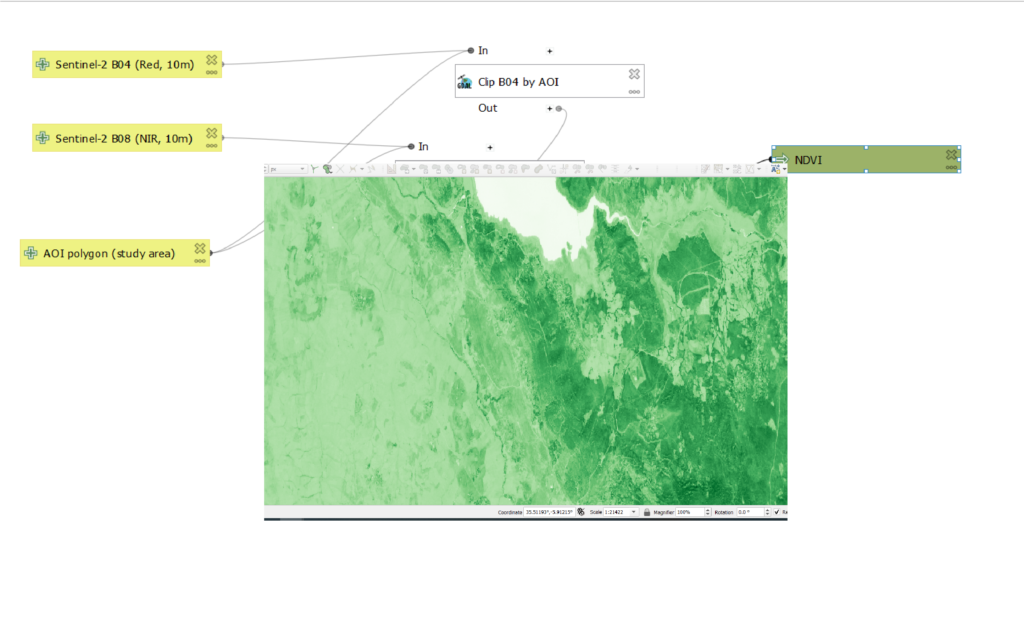
Creating an NDVI Model in QGIS
Step 1: Open Model Designer
Processing → Graphical Modeler
Step 2: Add Inputs
Add three inputs:
- Raster layer → B04
- Raster layer → B08
- Vector layer (Polygon) → AOI
Step 3: Add Algorithms
A. Clip B04
Algorithm:
GDAL → Clip raster by mask layer
- INPUT = B04
- MASK = AOI
B. Clip B08
Repeat same step for B08.
Step 4: Add Raster Calculator
Algorithm:
GDAL → Raster Calculator
Parameters:
- A = Clipped B08
- B = Clipped B04
- Formula:
(A - B) / (A + B + 0.0001) - Output type → Float32
Step 5: Save Model
Click:
Save Model
This creates a .model3 file.
You can now:
- Reuse it anytime
- Share it with colleagues
- Integrate into larger workflows
- Run batch NDVI calculations
5. Using an Existing Model3 File
If you already have a .model3 file:
- Open QGIS
- Go to:
Processing Toolbox → Models → Open Existing Model - Select your NDVI model file
- Run it
- Provide:
- B04
- B08
- AOI
- Output location
The entire NDVI process runs automatically.
6. Common NDVI Problems
Problem: NDVI values are greater than 1
Cause:
- Output data type not set to Float32
Solution:
- Recalculate with Float32 output
Problem: Only water appears
Cause:
- Winter/dry season image
- Incorrect symbology stretch
Fix:
- Manually set NDVI range from -1 to 1
Problem: Strange extreme values
Solution:
Always add small constant:
+ 0.0001
7. Extracting Vegetation or Water
Vegetation mask:
NDVI > 0.2
Water mask:
NDVI < 0
These can be added as additional steps inside your Model3 file.
8. Final Thoughts
Combining Sentinel-2 imagery with QGIS provides a powerful, open-source solution for vegetation monitoring.
Manual NDVI calculation is useful for learning.
Model3 automation is essential for professional workflows.
For environmental monitoring, agriculture, hydrology, or climate studies, mastering NDVI in QGIS is a foundational ski